Travel Photography Tips You Must Know Before Selling Your Photos
Having a good knowledge about travel photography tips and tricks is really important especially if you want to monetize your holiday and set it into your money machine. Hi there welcome to my travel blog and thank you for stopping by, this is Bima here and I travel for the past decade both for leisure and my photography business.
First time I knew about photography was in 2004 when I saw my friend holding a retro Nikon FM10 costs about US$279.99 on Amazon, it’s a 35 mm film format actually and we need to centerline the path to get great images. Just few months after I ask my mom to give me some money to buy semi-automatic camera, the Nikon N80 cost US$89, it was great for my first camera and I surely can get about USD9/hour for documentation event.
What I will share here is you definitely able to monetize your travel and food photos rather than keep it on your hard drive! So today I’m gonna give you my personal travel photography tips that will help you to shoot and get the fine result.
Travel Photography Tips for Beginners
1 – Having a mirrorless camera
Since technology is growing so fast right now, I suggest you to buy a mirrorless camera for beginner that will give you simplicity of capturing moments and surprising you with their awesome feature. On the link that I shared you will see various type of simple mirrorless camera with outstanding design and feature which able to help you to create great images.
Shortly I can suggest you to consider these 5 cameras:
- Sony Alpha a6300 + 16-50 mm power zoom lens – US$898
- Canon EOS M100 + EF-M 15-45mm f/3.5-6.3 IS STM Lens (Graphite) – US$479
- Fujifilm X-A3 with 16-50 mm lens – US$525
- Samsung NX300 with 20-50 mm lens – US$1,095
- Lumix G7 + 14-42 mm – USD497
All of cameras that I mentioned above also have a video feature which able to produce the 4K video, it’s beyond the HD video quality so if you want to make video too than all the cameras above are the 5 best choices from me.
2 – Learning about composition
Photo composition is the 2nd travel photography tips that you must know cause even you capture a simple image but if you got the best composition on it than it looks stunning.
There is no specific rules about composition so all you need to do is get more practice regularly and use your heart to capture. Go take some simple photo from different angle and to push the shutter button, feel it and see which is the best depend on your heart. Ask your friends about your first images and let them choose the best for you.
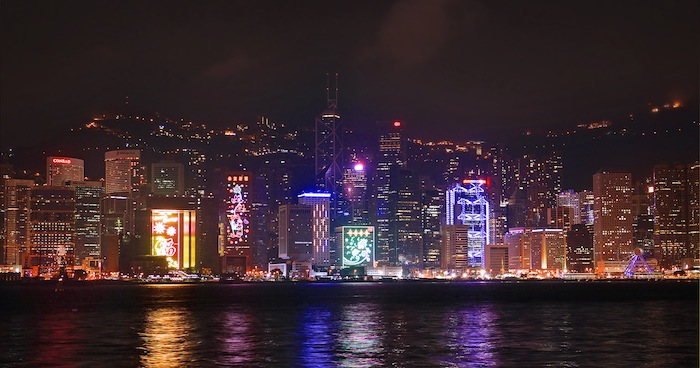
See my image below, if you ever go to Hong Kong than you should know where I standing by! Yes its Avenue of Star where you can access within 10 minutes walk from East Tsim Sha Tsui MTR Station. If you looking for a simple budget hotel near the Avenue of Star than I recommend Marrigold Hostel which is only 70 meter from the station, just walk out through your hostel building and turn left for little walk.
I shoot a Hong Kong high-rise building from the Avenue of Star, to shoot a night scape like this you definitely need a tripod to stabilize your camera. If you push yourself to use your hands than you should increase your ISO number which make your photos will consist a lot of noise.
My travel photography tips on this image is, try to set the Hong Kong sea for 1/3 for whole image, through this way than you will put the building in the center and give some other 1/3 space for the sky. Go try to shoot with different composition and compare it!
Here I set my camera in manual mode and get some data such as 35 mm focal length, f number 8, and exposure time in 2 second. Definitely it’s a slow speed photo shoot so better for you to have your own tripod. You don’t need to buy the Manfrotto that cost over than US$1500 for your first tripod but you can choose other simple tripod like Mactrem that cost only US$39.99 on Amazon
3 – Know your aperture number
Generally an aperture is your lens opening, some common lens will have a standard aperture from 3.5 to 22 and what is the difference?
If you want to get sharp image than you can set your aperture number around 8 or above but if you want to get ‘super’ sharp image than you can try to set it on 22. For the opposite, if you set your aperture number in 3.5 or lower than your image will be soft or even you will able to get blur background.
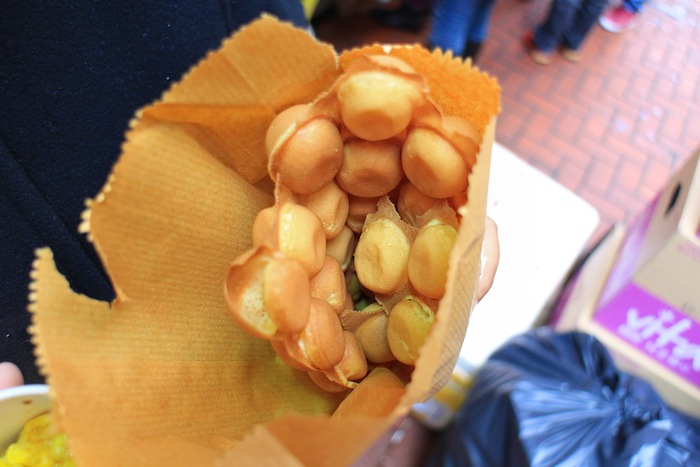
Take a look this Hong Kong egg waffle image below, I set my aperture number in 3.5 so if you see the background of the waffle which is the red walking path, boxes, or leg of some people than you will see it become blur. By set the aperture in 3.5 you will get the egg waffle in sharp but the background in blur.
It is totally different with my past Hong Kong high-rise building photo, since I set the aperture number in 8 than all the images (sea, night sky, and the buildings) will sharp. Here I got an image data for 18 mm focal length, f number 3.5, and exposure time 1/160….and I shoot it in a daytime!
4 – Know your camera speed
Camera speed is really matter to in photography, through this feature you can make any amazing pictures that will blown your and viewer mind. You can make stop action car like in Formula 1 photo, create good ambiance for night building photos or make a bulb photo in the night, it simple trick to shoot a night scape with car’s light that looks like a laser.
Take a look my portrait below, my wife shoot me with a low speed so you can see people walking in the right side gonna be moving blur and also red Hong Kong taxi behind me is also looks moving.

5 – Learn basic ways to sell your travel photos online
I use shutterstock to sell my stock photo in all genre especially travel and food photos which is related to this blog. This is one of greatest company with high demand traffic that help you to earn money by selling photos even while you sleep like a baby,
I wrote an article about How Earn Money by Selling Travel Photos Online so if you wanna learn more about it than you can read it too.
6 – Get a simple learning of post production
Post production is the last travel photography tips that I recommend you to know, no matter you got an expert photography but living in a digital era like now will push us to learn more about it.
When you love doing post production with Photoshop I recommend you to got this 36 Professional Photoshop Tutorials but if you love Lightroom better than I recommend you go this Lightroom Mastery Tutorials.